
My old ARB awning worked well for what it was for many years and I am glad I had it. I finally decided to upgrade to something bigger and better and to that end decided on the Alu-Cab 270 Shadow Awning.

Numerous companies make 270 degree awnings at various price points but only two that I know of utilize a reflective fabric which was one of my main requirements and the other company had more than a few less than stellar reviews regarding their fit and finish. While about six times more expensive than my old ARB awning the Alu-Cab is still is less expensive than another option I looked at, the Kinsmen Hardware awning at $2,550.00! That thing looks gorgeous and stout but also made mostly of steel and weighs about 20 pounds more than my mostly aluminum Alu-Cab which is already giving me cause to reinforce my mounting brackets and new roof rack a bit.
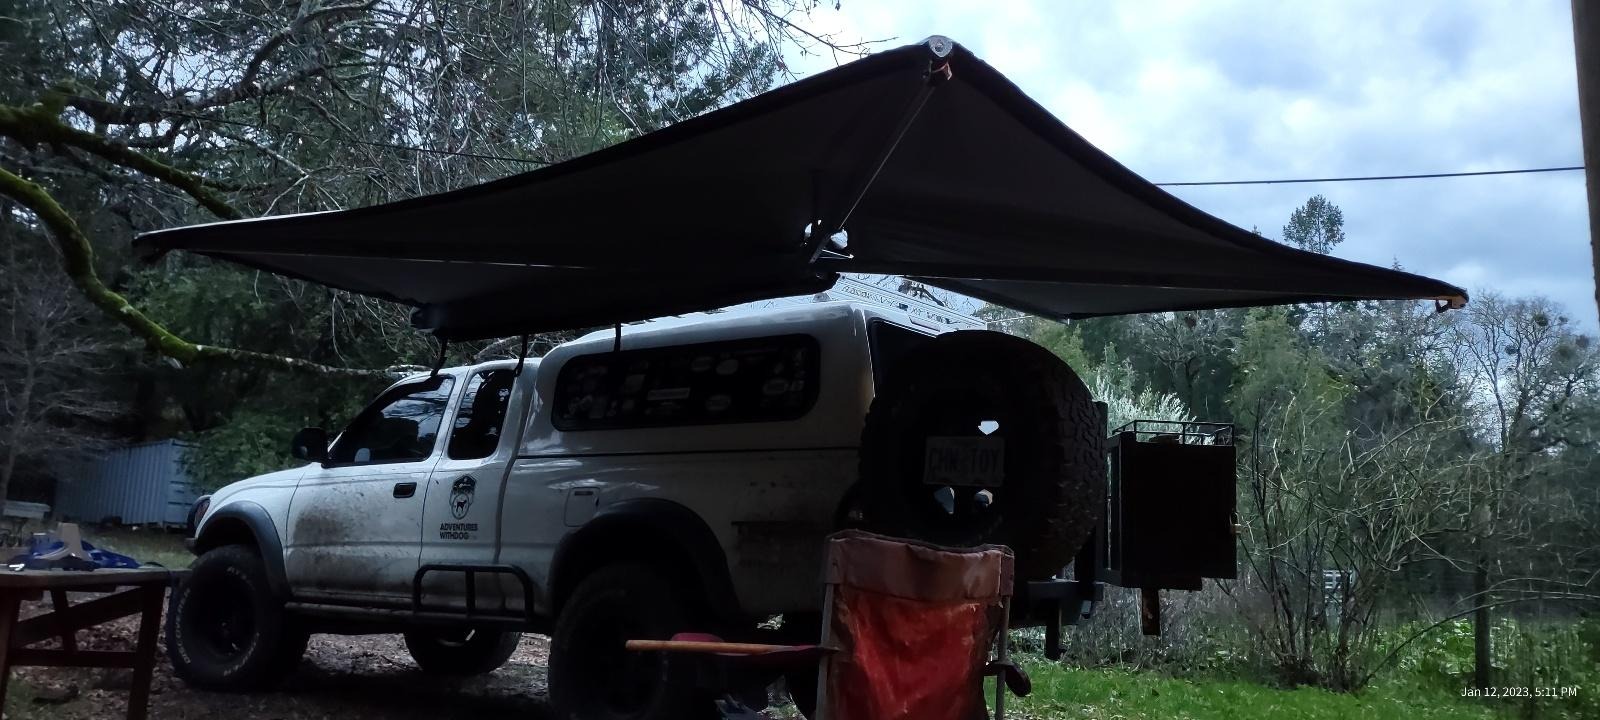
The Shadow Awning has several great features that directly mitigate some of my issues with the ARB. One, it has the reflective material so much less heat should seep through it and onto me or my stuff under it. Two, it has double the coverage area of the ARB (10 m2 vs 5 m2) and pulls all the way around to the back to cover the tailgate area where I usually setup a cooking area. It will be nice back there now in the rain and sun. Third, in the right conditions it is freestanding with no need for any poles to hold it up. If I do need to use the guy lines the Alu-Cab straps are big and bright orange and hard to miss so hopefully no more tripping over guy lines!
While the main reason to use an awning is undoubtedly to create shade in sunny climates the secondary and still important use for us is to provide a dry area when the rains roll in. By default it works fine for that but I have noticed that there are areas where rainwater pools and, given enough time, that water can add up enough to be a large, heavy collection causing sagging and stress on the whole system. With my old ARB awning I could easily just lower one leg and angle the whole awning down and towards that direction. That adjustment also made it easy to collect runoff rainwater if we wanted to supplement the water we brought with us. With the Alu-Cab it is easy enough to just reach up and push next to the pool and force it to roll off the awning (and step back quickly from the resulting deluge) that is a less-than-desirable task in the middle of a storm or late at night. Alu-Cab sells their optional Storm Tie Down Kit (available at many retailers and online but not at Amazon) which consists of a set of three each of; tarp clips, lengths of rope and tent stakes all in a little nylon bag…for about $100. Expensive for what it is but probably worth it if I didn’t already have all those items. Took all of ten minutes to cut three lengths of braided nylon rope, melt the ends together, tie each of them to a tarp clip and add that to the little nylon bag that came riveted to the awning to hold three tiedown stakes. Makes a noticeable improvement in water runoff and also adds additional anchorage during strong winds.
 The main structural component of the awning assembly is a riveted, aluminum C-section beam that everything else the awning needs to work properly attaches to. It comes with pre-drilled holes as attachment points for whatever roof rack system you are using. In my case (mounting an 8.5 ft awning to a 5 ft roof rack) means some holes were in the proper place but I still ended up “customizing” it and added more where I needed them.

It has 4 arms, three of which I consider “main” arms and the fourth is a substantially thinner arm that pulls and guides the fabric that last bit to get it around the rear and over the tailgate area. For this smaller arm I chose to not follow the Buckle Strap instructions (mount it to the small arm with a pop-rivet and cut off all the rest of the strap) and instead mounted the whimsical little aluminum C-Clamp extrusion that Alu-Cab wanted me to permanently mount to the Tacoma or roof rack.


This way, instead of a big buckle rubbing against the fabric when stored in the storage bag I now have this small, smooth little piece of aluminum in there. Plus, the spot where I wanted to attach the other end of the tensioning strap system required a longer strap than what came on the C-Clamp extrusion strap.

Now with the length of both straps (the buckle and C-Clamp Extrusion Straps) to work with I sewed a hook from an old ratchet strap to the end of the buckle strap and now attach that end of the tensioning strap to the roof rack and pull it snug.


The Shadow Awn comes with one fold-down pole that mounts out of the way to one of the main arms which can be deployed in mere seconds.

The other two main arms have holes already drilled if one was wanting to add additional poles. They also have attached straps stored within the hollows of those main arms so you can quickly and easily deploy guy lines in less than calm weather if need be.

The Shadow Awning is longer than the ARB and as such it sticks farther forward when in stored mode than the area I have to mount it to on the roof rack.

It also has to be mounted with the end of the awning that houses the attachments and pivot points for all four arms as close to the back end of the camper shell as possible so that the rear awning panel can rotate correctly and cover the tailgate area.


The rack is mounted to the Yakima tracks that came with the camper shell which are considered 50″ long but offer an actual 48″ of connection space. Unfortunately those tracks do not extend all the way to the rear end of the camper shell. This means that the pivot point where the vast majority of stress is focused cannot be attached to a load bar with a direct attachment to a mounting foot. To mitigate that additional focused stress I have added additional load bars, mounting brackets and feet to my Sherpa Roof Rack down at the end where all those forces are gathered.

It is certainly an extravagant and pricey upgrade from the old ARB both in coverage and ease of deployment. Even so it has both pluses and minuses:
Pluses:
* Lots of coverage (10 square meters)
* Acrylic-aluminized fabric (for light and heat reflection)
* Strong enough to be deployed free-standing (in the right conditions)
Minuses:
* Price
* Length when stowed (2.6 m/8.5 ft)
* Heavy (24 kg/53 lbs)
* Cannot be tilted/angled down to stop rain pooling and facilitate runoff
For me it is the very definition of a “buy once, cry once” purchase but it is a substantial upgrade and I am glad I did it. Once I am at a camp spot and the awning is deployed it is well worth it.
Thank you for posting. Great idea to reverse the install of the C clamp!
Greetings from Scotland. Thank you for posting this informative info on the 270° awning Alu-Cab – 2.6m. I’m researching atm and you’ve helped me get over the fixing to my roof rack worries. Great pictures too. Thanks again.